Don't miss your chance to invest in 'Fabiola'!
Visit our crowd-funding page for our new production, "Fabiola"!
- Home
- Movie Making Course
- How To Make A Call Sheet
Are You Ready To Build Your Call Sheet? In Phase 10, You Are Going To Learn How To Write A Call Sheet And See An Example Of Call Sheet
Here is where you will see an example of call sheet and learn the step-by-step process of how to write a call sheet.
In the last phase, you decided what order you plan on shooting your film and what your schedule is likely to look like. Now it's time to write the call sheet.
This phase will teach you how to:
- Head a call sheet
- Present a detailed schedule on a call sheet
- Number talent
- List what needs to be on set: costume and prop-wise
- Present a simple schedule
- List crew on a call sheet
At the end of the phase you will view a example of call sheet from the short film Pelayo. Be sure to look at that example of call sheet before you move on to the next phase.
Let's dive into how to make a film call sheet!
1. Get The Right Feel With Your Header And First Page
First of all, divide your page into three columns.
In the middle column, head your paper with the name of your movie and its working cover.

The picture on the right shows what our scene from FABIOLA call sheet header image looked like.
In the left column, put the address and name of your production company.
Next, let your actors know the top three people to contact with questions.
We have the producer Kathleen Bowen, the creative director Mary Bowen, and the production director Faustina Bowen as our top contacts. Include position and phone numbers with each name.
In the middle row, list the project name, what number shoot this is and time of arrival. Like so:
Fabiola, Shoot Day 1
General Crew Call
9:00 a.m.
Here "general crew call" refers to when everyone is supposed to be there officially. The crew arrives before the rest of the cast, usually about a half hour. This gives the crew time to get there and set up and be ready before the cast arrives. For this particular shoot, we were shuttling actors and crew together, so the general crew call was the same as the actor call.
After a break, give any special directions about the location that are needed. This may include hazards (swift river near-by, please stay with the rest of the cast and crew at all times) or requests from the owner of the set location (it is very kind of the owner to let us use this location, please be sure to shut all gates coming in so that the horses stay in their pen).
Now move on to the left column. The date goes at the top of the column. Next comes the shoot day in a # of # (2 of 7) format.
Next, especially if your shoot is outdoors, comes the weather forecast for the day. This includes:
- High and low temperature prediction,
- Sunrise and sunset times,
- Likelihood of rain (mostly if it's an outdoor shot)
After another divider, provide a very brief timeline for the day. This is more of a "your day at a glance". You will be providing a more in-depth schedule on the next page.
In a table at the bottom of the page, have three columns labeled Set Location, Parking and Notes, and Nearest Hospital.
In the first column, include the location and address for shooting. In the second column, tell people where they will be expected to park and any instructions on where to find you after parking.
You may be meeting somewhere before taking a little hike to the actual location. Or, even shuttling people from the parking area to the location!
Nearest hospital is not to scare people into thinking that this is going to possibly be dangerous, just letting them know that you are aware of the nearest hospital and are ready to react appropriately in an emergency situation. Provide the hospital name and address.
Task 1 Checklist:
Make sure the first page of your call sheet has:
1. The working cover of the film
2. Your company's name and address
3. Top three contacts
4. Project name, number of shoot, and time of arrival
5. Special instructions about location
6. Date
7. Weather forecast
8. Set location, parking notes, and nearest hospital information
2. Don't Risk Confusion, Make A Schedule That Is Clear And Easy To Follow
Alright, now it's time to move on to the next page of your call sheet. It is very important that the entire cast is clear on when and where they are supposed to be arriving. This can easily be achieved by getting a schedule on your call sheet.
At the top, have the day's schedule in a table similar to the one below:
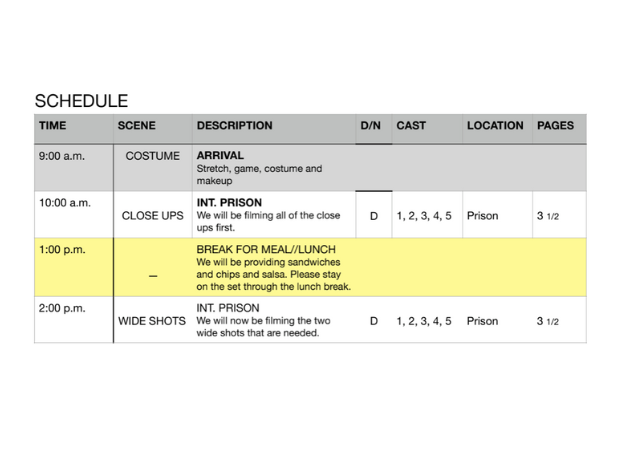
As you can see, this table begins by showing what time different aspects of the day start. Since everyone was already costumed, we decided to have a snack (less messy) in the middle of the shoot day and lunch at the end when everyone was out of their costumes.
This is something I would highly recommend!
Under the "Scene" heading, put what is happening at this time. In this table, we were only filming the hand-to-hand sequences, which is actually just part of a scene. Usually this would actually be a scene number.
"Description" is where you put the information about what is going on at this part of the day. Looking at the table above, you can see that we not only wrote a heading for each thing, but also a short description to make it clear to the cast what the day would be like.
"D/N" means "Day or Night". Put "D" if the scene takes place during the day and "N" if it takes place at night.
In the next column, you see a few numbers and "extras". The numbers actually refer to the actor. More about this in a minute.
And, of course, "Location" is where you put the location and "Pages" is where you put the number of pages of script that you are filming.
Task 2 Checklist:
Ensure there is no confusion by having a schedule that includes:
1. Times for each event of the day
2. Scene number
3. Descriptions of each event
4. Whether the scene is supposed to take place during the day or at night
5. Location and number of pages.
3. Learn How To Number Your Talent To Ensure Actors Know Which Shoots They Need To Appear In
In Final Draft, go to "Tools" and find "Reports". Select "Cast Report". A message will appear with different specifications, select how you would like it to be presented (I usually just go with what the default is), and get your report pulled up.
It should look something like this image:

If it doesn't look like the above image, you selected the wrong report. I did need to add my own # symbol and numbers. It took a little bit of formatting, but I'm sure you can get it too.
Now for the purpose of this example of call sheet, I used a very simple script. This short film was one scene with two characters. If you had a larger story, you would have 10, 15, even 30 different characters.
Back at your call sheet, make a table like the one below:
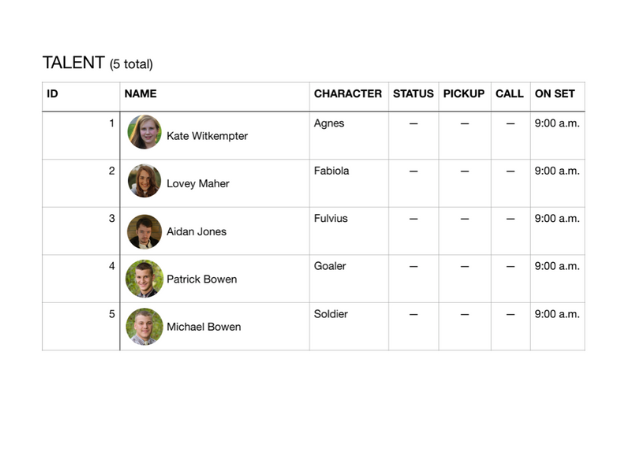
It's kind of self explanatory, but make sure you include talent number, actor name, character name, pickup time (if applicable), when they are expected to arrive ("Call"), when they are expected to be on set, and even bio pictures if you want.
Make as many rows as actors you have for this particular shoot. Be sure to always use the same number for a character. That way an actor can look at the call sheet and think, "I am 12. Do they need 12 for this shoot?"
Beneath your talent table, have an "Extras & Atmosphere" table. This table has the headings:
- QTY
- Character and
- Call and On Set
In "QTY" you put how many of what kind of extras you need. Under "Character" write what kind of extras you need (waitresses, merchants, even animals: dogs, horses, goats, camels...)
Your "Call" and "On Set" will most likely be the same as for the talent unless there is a particular reason you need them there after the talent.
Task 3 Checklist:
1. Get a cast report and number your talent
2. Make a table on the call sheet that specifies which actors are needed for the shoot.
3. Make a table explaining the extras you need on set.
4. Ensure That You Have All Your Costumes And Props By Including Them On The Call Sheet
Your props and costumes list doesn't need to be elaborate, just another simple table. Under a "Special Instructions", drop another table.
Have "Departments" and "Notes" be the headings on your table.
Under "Departments", have a "Props" row, a "Costumes" row and a "Set" row. In some cases, you will also have a "Sound" row.
In the "Props" row notes, make a list of props needed for the scene.
Props often include weapons, set pieces that get moved by the characters in the scene, props that don't always appear on this set and costume pieces that are removed during the scene.
In the next row, "Costumes", list the costumes you need for the scene. Usually this will say something like "Sir Leonard Costume" because the costume should be all on one hanger together.
Be sure, however, that anything that is not on the hanger is included in your list (armor, shoes, cloak).
Last row (usually), "Set", is where you will list what you need to complete the set. Since items that are moved are considered to be props, all that needs to be listed here are set pieces that aren't going to move (beds, rugs, couches, candelabras, set treatment).
When I say "set treatment", I mean things like the silver spot in the Earl's Room in Outlaws of Ravenhurst. This is a set item that can easily be overlooked if it isn't on a list!
Another department you might use is "Sound". A "Sound" row is where you would list background sounds that you might need (a creak that tells the characters they are being spied on). Other sounds could be street noise, barnyard noises, birds, etc.
Task 4 Checklist:
In a simple table, list the things you need in these departments:
1. Props
2. Costumes
3. Set
4. Sound (optional)
5. List One More Simplified Schedule Here At The Bottom Of Your Call Sheet!
Under an "Advance Schedule" heading, put one more very simple schedule.
I know that Task 2 showed you how to make a really detailed call sheet, but here at the bottom of your call sheet you need one more schedule. This one is going to be super simple with just start time, scene number, day/night, cast, location, number of script pages, and estimated length.
"Why so many schedules?" you may ask.
Having the place, date, time, and estimated length of your shoot listed several times on your call sheet makes it very unlikely that your cast will overlook these important details. (Just be sure they are consistent over the sheet 😉!)
Be sure to look at the example of call sheet at the bottom of this phase to be sure you have the right kind of format for this schedule.
Task 5 Checklist:
Make a very simple schedule restating the:
- Start time
- Scene number
- Day/Night
- Cast members
- Location
- Number of script pages
- Estimated shoot length
of your shoot.
6. Let People Know Which Crew Members Need To Be There In This Last Task And Check Out A Pelayo Example Of Call Sheet
Alright, one last task and one more table. Under a "Crew" heading, drop one more table. Your sections this time will be "Position" and "Name". The table will be subdivided into black backgrounds that read: "Production", "Art Department", "Script", "Lighting", and whatever other categories you may need.
Under "Production" put the titles of your production crew (Director, Producer, 1st Assistant Director, and 2nd Assistant Director). In the "Name" column, put the names of your crew members.
Do the same with the other departments.
Task 6 Checklist:
List your crew members in their respective departments and positions.
Alright, I'm sure you are eager to keep moving forward, but please take one more moment to look over these two examples of call sheet to ensure yours looks similar and you didn't miss anything:
Ready for the next phase? I know this one was long and involved, but you did it! Now go ahead and learn the ins and outs of:
Have You Looked Over Our Example Of Call Sheet And Still Have Questions?
I get it, this was a lot of information. Did I leave you still wondering about something? Do you have any more questions about call sheet formatting, how we use our call sheets, call sheets in general?
Please submit your question below. I'd be happy to hear what I can help you with!
We can't wait to hear about your accomplishments and celebrate with you. So, please, don't hesitate to tell us what you are thinking!
