- Home
- Movie Making Course
- How to Film a Movie
You're Finally Here! Phase 13 Teaches You How To Film A Movie With Tips On How To Get Easy Cinematic Shots That Look Amazing

Now that you have completed your rehearsals, learned how to apply stage make-up and how to set up stage lighting, it's time to move into learning how to film a movie in Phase 13.
This phase will teach you how to:
- Determine what your shoot days are going to look like
- Get one great wide shot
- Plan the super easy cinematic close ups that are going to boost your films into a more professional category
- Wrap the day up!
Although all the previous phases are important, it's easy for to feel like they are a waste of time or a drag.
Now that you are here, things are going to feel much more like you are actually doing something. Although it's going to get more exciting, it's also going to get more challenging.
Are you ready for Phase 13?
Let's get started!
Task 1. Get Your Set And Actors Ready With Last Minute Improvements, Costumes, And Make-Up
Remember, for every page of script, you will need about an hour of shooting. So, at this point, you have already sent out your call sheet, everyone has confirmed the day, time and place. Let's say you are working with a 5 page script so everyone also knows that they are needed for 5 hours.
You should get to the location a little earlier than the actors. Things can go wrong and that extra hour is a nice cushion for running back to the studio to get that costume that you forgot or to get a head start on getting the set up.
You can organize your shoot day however you want but ours starts with an exercise followed by a short game.
Afterwards we move on to costuming.
If your crew is large enough, your art department would take over here and get everyone dressed and makeup'd. On our shoot days, and most likely at yours, we all pitch in here. I hand the actors their costumes and send them to a changing room. We all know how to do the makeup if needed although Mom usually takes care of the makeup.

After costuming, apply makeup. Once everyone has their makeup on, move into the actual filming. Here's the process:
- Have the actors preform a dry run.
- Tweak what you need in the acting.
- Film a wide.
- Film close-ups.
- Wrap it up!
First of all, have your actors preform the scene without recording it. If it has already been well-rehearsed, this should go pretty smoothly.
After having watched the scene in the set, is there anything you want to change? Does any scene entering and exiting go smoothly? Would it actually look better if the actors were on the other side of the set?
Make these adjustments, go through the scene one more time and set up your lights and camera for the wide shot.
When you set up your camera, make sure that you have everything you want in the shot, especially the tops of your actor's heads.
Task 1 Checklist:
1. Start with stretches and a game.
2. Get costumes on all your actors.
3. Apply makeup.
4. Go through the scene a few times, making adjustments before you begin filming.
5. Set up the camera for a wide.
6. Set up lights.
Task 2. Set The Stage With Your Wide Shot
Every time you shoot, be sure to start the clip with a "Quiet on the set!". This lets everyone know that you are filming and that they need to ensure that there is no unwanted background noise. That includes:
- Whispering,
- Loud footsteps, and
- Rustling costumes.
End with "Cut!" to let everyone know you are done with the shot.
If "Quiet on the Set" is not respected, don't be afraid to have a little bit of discipline. Nothing too hard, something like 10 pushups for the boys, 10 jumping jacks for girls.
Once everyone is quiet, start recording. Say "Action!" Be sure that your actors are ready to be in character for the first five seconds before they start acting the scene as well as five seconds after the scene. This gives you wiggle room for editing.
All calls are repeated by the assistant director to ensure that everyone hears.
What A Shot Sounds Like
Here's a peek at what your set will sound like before and after shots.
"Quiet on the set."
"Quiet on the set."
(Record on camera is pushed.)
"Action!"
(Record on sound is pushed.)
"Action!"
(5 seconds, counted down by the assistant director, is counted. Scene plays out. 5 seconds of silence. Camera stops recording.)
"Cut!"
(Sound stops recording)
"Cut!"
(Room returns to normal, speaking is again permitted until the next "quiet on the set".)
Now this is really important. Always make sure you get one full wide shot, without any mistakes or restarts. You will thank yourself a million times over when it comes time to edit.
Once you've gotten one good wide shot, move in for close shots. (Two smooth shots of the same angle is better - as Jim Morlino says, "One more for safety!")
Just a quick note: the best time to break for lunch (or snack) is typically after the wide shot. It is motivating to feel like you've already gotten a good chunk of work done and will help you feel pumped to finish after lunch.
Task 2 Checklist:
1. Call out "Quiet on the set"
2. Push record and call out "Action!"
3. Let five seconds of just acting pass before and after acting the scene out.
4. Call out "Cut" when the scene is over.
5. Retake the scene until you have one (or two!) shots without any hesitations or hiccups.
Task 3. Tell A Powerful Story With Great Close Ups That Capture The Actor's Expressions And Feelings
Remember that every time you move the camera, you have to reposition your lights too. Start by getting the actor in frame for the close-up.
When filming a close-up it is important to get the right position. You don't want the actor to be too profile, but you also don't want straight on.
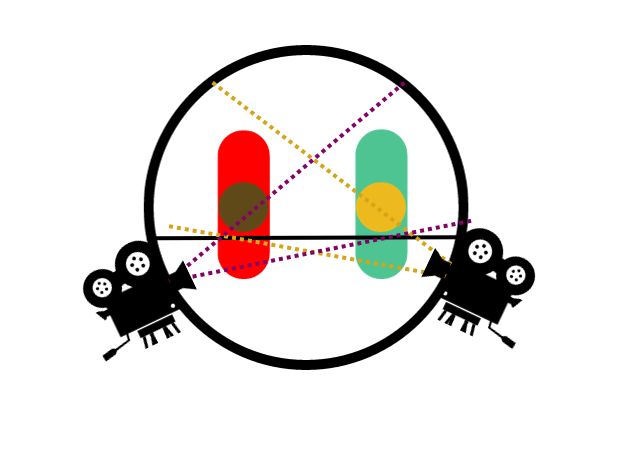
Refer to this diagram for where to place your camera for close shots:
 Thank you, Jim Morlino, for teaching me this trick.
As you can see from the drawing above, imagine a circle around your two characters. Divide the circle on one side of them. Shoot one of the characters always using this angle with a little bit of the other character's head in shot (unless, that is, you are trying to shoot a really dramatic closeup of the character's expression).
This gives a point of reference so that the audience knows where they are in the set. Movies in which you suddenly feel confused about what angle you are even looking at usually neglected to do this.
When planning a shoot day, Mary and I often talk about "crossing the line" and how to avoid it. We are referring to the line in the image above. So always make sure that you don't "cross the line". You will regret it later.
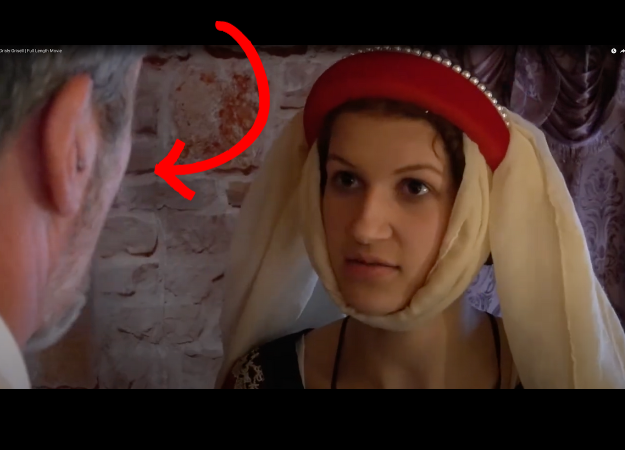
Have a look at what this shot looks like on screen:

You will notice that this frame is not super close to the actress' (my) face. First of all, people in general do not get extremely close to one another when they are speaking. Since you want your movie to be as life-like as possible, you aren't going to want very many extreme closeups.
Plus, you put a lot of effort into your costumes, so show them off as much as possible!
Of course there are exceptions to this general rule where you may want to get closer. Such exceptions include:
- A moment the character realizes something momentous
- During a heated debate between characters
- When the character is in a moment of suspense
Otherwise, do your audience a favor and have a point of reference in your close shots.
Once you have the actor in the frame, be sure to position the lights and begin filming. Use the same process of "Quiet on the Set", "Action", five seconds of just acting, and "Cut" as you used for the wide shot.
Do the scene from the top and get all of this character's close-ups at once. This is different from your wide because this time there can be a few hiccups without starting the scene completely over.
Just pause, cut if you need to, and start the line over.
Sometimes it's helpful to have the actor who is not being filmed to cue the line with his preceding line.
For the most part, you aren't going to want to cut during this close up. Of course, if it's 10 minutes long and mostly goofing off, cut. But you want as much footage of each character as possible.
This gives you a lot of wiggle room when you are editing. You will love yourself for catching that wonderful expression and enough footage to cover that small hesitation of the speaking character. Believe me!
Once you are done with one actor's closeups, move on to the next character and so on until you have every character's close ups done. Typically, a simple scene with two speaking characters will be three shot angles: a wide, character #1's closeup, and character #2's closeup.
Task 3 Checklist:
1. Get your actor in frame on your camera. Not too close, not too profile, not too head-on.
2. Set up the lights.
3. Film one character's close-ups recording not just lines but also reactions.
4. Repeat until you have recorded close-ups of all the characters.
Task 4. Wrap Up Your Day In A Way That Makes You Excited And Ready For More!

When you are completely done filming for the day announce, "That's a wrap!" and let everyone go. Encourage your actors to hang up their own costumes and return them to the rack.
Also provide makeup wipes (especially for the guys!) so that your actors can wash their makeup off. Send your actors home and start getting everything picked up for the next shoot.
You may be tempted to leave everything for tomorrow, but I highly recommend picking everything up right away. This makes it so that you know where everything is and will save you a daunting task of picking everything up later.
Much better to do it while you are in the mood. No one wants to come back to a mess, so get it all picked up now.
Task 4 Checklist:
1. Get costumes off and neatly put away.
2. Provide makeup wipes for your actors.
3. Pick up the mess.
Now that we've gone over how to film a movie, it's time to take your footage to the computer and get ready to move on to Phase 14: Editing. We recommend editing as you film because it is much easier to find everything on your memory cards that way.
So...take your recorded sound and video footage and head on to Phase 14:
